Hello guys lets continue with the development of Helix Jump using THREE.JS
In the previous tutorial ( Part1 ) we learned how to create a scene, camera, renderer and finally how to render all these things.
We have added background to our game and added a cylinder.
If you have not download the resources please download it from Part 1 of the tutorial
Load Platforms
Further lets add few more objects. This is for MTLLoader.js and OBJLoader.js is used
Game.loadResources = function() {

    .............
    .............
    .............
    .............

    this.cylinderGroup = new THREE.Group();
    this.cylinderGroup.add(this.cylinder);
    this.scene.add(this.cylinderGroup);

    var models = {
        ball: {
            obj: "res/Ball.obj",
            mtl: "res/Ball.mtl",
            mesh: null
        }
    };
    var pie = {
        obj: "res/Pie.obj",
        mtl: null,
        mesh: null
    };

    // LOADING MODELS
    for (var _key in models) {
        (function(key) {

            var mtlLoader = new THREE.MTLLoader(Game.loadingManager);
            mtlLoader.load(models[key].mtl, function(materials) {
                materials.preload();

                var objLoader = new THREE.OBJLoader(Game.loadingManager);

                objLoader.setMaterials(materials);
                objLoader.load(models[key].obj, function(mesh) {

                    mesh.scale.set(0.2, 0.2, 0.2);
                    mesh.traverse(function(node) {
                        if (node instanceof THREE.Mesh) {
                            node.castShadow = true;
                            node.receiveShadow = true;
                            node.material.color.setHex(0xE74C3C);
                        }
                    });
                    Game.ball = mesh;
                });
            });

        })(_key);
    }
}
A model consist of a .obj and .mtl file, but you can see for ball both files are included but for pie
only .obj file is included, so we can put our own material to it.
If multiple models are there to load then we can you for loop to load, although we are loading only a single model (ball) i have used for loop just to show how to load multiple objects.
To set other properties (like color, cashShadow ) to object we need to traverse the mesh and set properties to it.
mesh.traverse(function(node) {
    if (node instanceof THREE.Mesh) {
        node.castShadow = true;
        node.receiveShadow = true;
        node.material.color.setHex(0xE74C3C);
    }
});
Finally lets add platforms to which the ball will collide.
Game.loadResources = function() {

    .............
    .............
    .............
    .............

    this.cylinderGroup = new THREE.Group();
    this.cylinderGroup.add(this.cylinder);
    this.scene.add(this.cylinderGroup);

    var models = {
        ball: {
            obj: "res/Ball.obj",
            mtl: "res/Ball.mtl",
            mesh: null
        }
    };
    var pie = {
        obj: "res/Pie.obj",
        mtl: null,
        mesh: null
    };

    // LOADING MODELS
    for (var _key in models) {
        (function(key) {

            var mtlLoader = new THREE.MTLLoader(Game.loadingManager);
            mtlLoader.load(models[key].mtl, function(materials) {
                materials.preload();

                var objLoader = new THREE.OBJLoader(Game.loadingManager);

                objLoader.setMaterials(materials);
                objLoader.load(models[key].obj, function(mesh) {

                    mesh.scale.set(0.2, 0.2, 0.2);
                    mesh.traverse(function(node) {
                        if (node instanceof THREE.Mesh) {
                            node.castShadow = true;
                            node.receiveShadow = true;
                            node.material.color.setHex(0xE74C3C);
                        }
                    });
                    Game.ball = mesh;
                });
            });

        })(_key);
    }

    var textureLoader = new THREE.TextureLoader(this.loadingManager);
    var pieTexture = textureLoader.load("res/pie.jpg");
    var objLoader = new THREE.OBJLoader(this.loadingManager);
    objLoader.load(pie.obj, function(mesh) {
        mesh.traverse(function(node) {
            if (node instanceof THREE.Mesh) {
                node.castShadow = true;
                node.receiveShadow = true;
                node.material.map = pieTexture;
                node.material.color.setHex(0x922B21);
            }
        });
        Game.redPlatform = mesh.clone(); // because we need two type of platforms ( red and green)
    });

    var textureLoader2 = new THREE.TextureLoader(this.loadingManager);
    var pieTexture2 = textureLoader2.load("res/pie.jpg");
    var objLoader2 = new THREE.OBJLoader(this.loadingManager);
    objLoader2.load(pie.obj, function(mesh) {
        mesh.traverse(function(node) {
            if (node instanceof THREE.Mesh) {
                node.castShadow = true;
                node.receiveShadow = true;
                node.material.map = pieTexture2;
                node.material.color.setHex(0x5499C7);
            }
        });
        Game.greenPlatform = mesh.clone(); // because we need two type of platforms ( red and green)
    });
}
Add material type and some constants which will be used further.
Game.materials = {
    solid: new THREE.MeshNormalMaterial({})
};
Game.MESH_VISIBILTY = false;
Game.USE_WIREFRAME = false;
Game.GAME_LOADED = false;
Game.GAME_STARTED = false;
Load Resource Listener
Add ball and sphere geometry after the resource is loaded
Game.onResourcesLoaded = function() {
   //ball = models.ball.mesh.clone();
    this.ball.scale.set(0.02, 0.02, 0.02);
    this.ball.position.set(0, 1, -2.25);
    this.scene.add(this.ball);

    this.sphere = new THREE.Mesh(
        new THREE.SphereGeometry(0.19, 20, 20), this.materials.solid);
    this.sphere.position.set(this.ball.position.x, this.ball.position.y, this.ball.position.z);
    this.sphere.geometry.computeBoundingSphere();
    this.scene.add(this.sphere);
    this.sphere.visible = this.MESH_VISIBILTY;


    this.cy = this.ball.position.y;
    this.cylinderGroup.rotation.y -= 1;
}
So far we have achieved this

Add Platforms to cylinder
Add a single platform in our game just too see how it looks like
( Make sure to call the addPlaform function inside onResourcesLoaded function )
Game.onResourcesLoaded = function() {
    ..........
    ..........

    this.addPlatform();

    this.cy = this.ball.position.y;
    this.cylinderGroup.rotation.y -= 1;
}

Game.addPlatform = function() {
    var platform = this.greenPlatform.clone();
    platform.position.y = 1;
    this.cylinderGroup.add(platform);
}
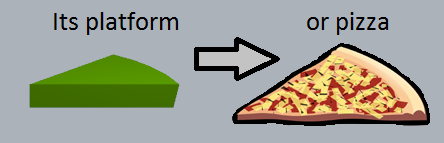
This is what it looks like.

I don't know why this platform looks like pizza to me!!
Add Platforms
In our game platforms must be randomly arranged with some random count at each level.
So in order to arrange the platforms we need to take random values and set at what Y difference the platforms will be arranged.
Game.addPlatform = function() {

    var yDiff = 2;
    var rotationValue = 0.786;
    var plIndex = -1;

    var randomPlatform = [
        {
            count: 1,
            rotation: [1.3],
            type: [0]

        },
        {
            count: 5,
            rotation: [2.8, 4.8, 5.8, 7.8, 0.8],
            type: [1, 0, 0, 1, 0]
        },
        {
            count: 3,
            rotation: [7.2, 6.2, 3.6],
            type: [0, 0, 1]
        },
        {
            count: 2,
            rotation: [0.2, 2.2],
            type: [0, 1]
        },
        {
            count: 5,
            rotation: [0.9, 2.9, 3.9, 4.9, 6.9, ],
            type: [1, 0, 1, 0, 0]
        },
        {
            count: 5,
            rotation: [0, 1, 2.3, 4.1, 6],
            type: [1, 0, 1, 0, 1]
        }

    ];

    var levelCount = 5;

    for (var a = 0; a < levelCount; a++) {

        ++plIndex;
        if (plIndex >= randomPlatform.length) {
            plIndex = 0;
        }

        for (var i = 0; i < randomPlatform[plIndex].count; i++) {
            var platformPiece = this.greenPlatform.clone();
            platformPiece.position.set(0, 0, 0);

            // platform group is taken because we will add collider to platformPiece
            // colliders will be added later
            var platGroup = new THREE.Group();
            platGroup.add(platformPiece);
            platGroup.rotation.y -= randomPlatform[plIndex].rotation[i] * rotationValue;
            platGroup.position.y -= (a * yDiff);
            this.cylinderGroup.add(platGroup);

        }
    }

}
Here we have took levelCount to 5 and according to randomPlatform count the platformPiece will be added
We have achieved this

I hope you got some idea how more platforms and levels will be added.
For now just practice our own. In next part we will discuss how to add collider and basic principles of collision detection.
Where to go from here? ( Part3 of the tutorial)
No comments:
Post a Comment
Note: Only a member of this blog may post a comment.