Tuesday, July 17, 2018

Helix Jump development tutorial using THREE.JS (Part 5)

Welcome to the 5th part of the Helix Jump development tutorial using THREE.JS
I hope you are doing great.

In the previous tutorial ( Part 4 ) you learned about game Physics, 3D axis and rotation and collision detection technique for this game.

In the previous tutorial, most of the concept of this game was covered. Now its time to make our game interactive by removing platforms we have crossed and not letting the ball bounce on red platforms.

Let's start with platform removal.

Remove Platforms

We have to detect which level of the platform is crossed. For this purpose, we took an array of the platform.

The basic idea is to iterate through the full length of the array to check which platform is crossed, but doing this is not economical because we may have many levels of platforms in our game, like 100 or even more than that ( Depending on the game complexity )

So the best way is to look only that index of the array of the platform which is not hit.
To do that I took a counter which is updated if the ball has crossed it.
Simultaneously update the score too.

This is the code. In findCollision function, I added a condition to check if the ball has crossed the platform or not, and then remove the platform if the ball has crossed it.

Game.findCollision = function() {

    ind = Math.abs(Math.round(this.cy));

    // add this if condition
    if (clearInd < ind) {
        this.breakPlatforms(clearInd);
        clearInd = ind;
    }

    if (this.colliderArr[ind]) {
        ...........
        ...........
        ...........
        ...........
        ...........
    }
    return false;
}

Game.breakPlatforms = function(clearInd) {
    clearInd = clearInd - 1;
    if (this.platformArr[clearInd]) {
        for (var i = 0; i < this.platformArr[clearInd].length; i++) {
            this.cylinderGroup.remove(this.platformArr[clearInd][i]);
        }
        this.platformArr[clearInd] = undefined;
        ++this.score;
        this.scoreBoard.innerHTML = "Score " + this.score;
    }
}

( I have just removed the platform, you can add tween to platforms to add realistic platform breaking behavior )

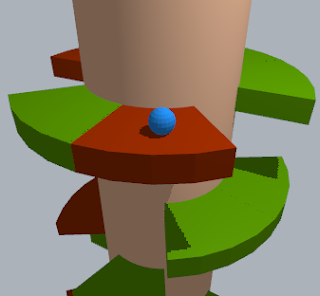
Till now if you run the game you will find when ball cross a level of the platform, the upper platforms are removed.

break crossed platform

As you can see in this image the platforms above the ball are removed.
Now you can turn you Game.MESH_VISIBILTY = false to hide colliders.

Change ball color

We can make our game more interactive by changing the color of the ball if it hits the red platform and then display game over. To do that we will add a type check if collision occurs to the red platform then we will restart our game again.

Platform type check is added in findCollision function

Game.findCollision = function() {

    ind = Math.abs(Math.round(this.cy));

    if (clearInd < ind) {
        this.breakPlatforms(clearInd);
        clearInd = ind;
    }

    if (this.colliderArr[ind]) {
        boxVector = new THREE.Vector3();
        for (var i = 0; i < this.colliderArr[ind].length; i++) {
            _cubeBox = this.colliderArr[ind][i];
            boxVector.setFromMatrixPosition(_cubeBox.matrixWorld);
            spherePos = this.sphere.position.clone();

            xPoint = boxVector.x;
            yPoint = boxVector.y - spherePos.y;
            zPoint = boxVector.z;

            if (xPoint < 0.6 && xPoint > -0.55 && yPoint <= 2 
                && yPoint >= -0.2 && zPoint < -1.8 && zPoint > -2.4) {
                if (_cubeBox.platformType === this.RED_PIECE) {
                    this.gameOver = true;
                    this.scoreBoard.innerHTML = "GAME OVER";
                    this.changeBallColor();
                    this.restart();
                }
                return true;
            }
        }
    }
    return false;
}

Game.changeBallColor = function () {

    this.ball.traverse(function (child) {
        if (child instanceof THREE.Mesh) {
            child.material.color.setHex(0x2287E5);
        }
    });
}

Game.restart = function () {
  

}

We have achieved this until now.

change object color three js

You can see ball color is changed to blue and game is stopped when the ball hits the red platform.

Reset Game Variables

Now we have to restart the game. To do that we need to reset all the properties and variables of the game.
Let's add game reset functionality.

Game.resetGame = function () {

    ind = undefined;
    _cubeBox = undefined;
    boxVector = undefined;
    spherePos = undefined;
    xPoint = undefined;
    yPoint = undefined;
    zPoint = undefined;
    clearInd = 0;

    for (var i = this.scene.children.length - 1; i >= 0; i--) {
        this.scene.remove(this.scene.children[i]);
    }
    this.addLights();
    this.GAME_STARTED = false;

    this.resetGravity();

    this.cameraY = -0.5;
    this.gameOver = false;
    this.score = 0;

    this.colliderArr = [];
    this.platformArr = [];

    this.scoreBoard.innerHTML = "Score 0";
    this.camera.position.set(0, this.player.height, -6);
    this.camera.lookAt(new THREE.Vector3(0, -this.player.height, 0));
    this.loadResources();
};

Restart Game

Let's add game restart code. We will restart the game in 3 seconds after the ball hits the red platform.

Game.restart = function () {
    var count = 2;
    var self = this;
    self.scoreBoard.innerHTML = "Game Restarting in " + (count + 1);

    var countDownId = setInterval(function () {
        if (count < 0) {
            clearInterval(countDownId);
            self.resetGame();
        } else {
            self.scoreBoard.innerHTML = "Game Restarting in " + count;
        }
        --count;

    }, 1000);
};

So far we have developed a complete game. You can increase the number of platforms level.
I hope you are good enough to add some more features to your game like completing the game. It all depends on you how much interactive game you can make.

If you want the complete source code of this game. click here

This is the end of this tutorial series. If you stuck at adding any feature or if you want any help please comment or contact me.

If you want a tutorial on any specific game, just leave a comment I will add another tutorial.

Guys see you later, keep visiting or subscribe to my tutorial for other fantastic tutorials on the cross-platform game.

Note - Some of the social sharing buttons may not appear if you have installed Adblock to your browser, so you can whitelist my blog.

Monday, July 16, 2018

Helix Jump development tutorial using THREE.JS (Part 4)

Welcome to the 4th part of the Helix Jump development tutorial using THREE.JS
I hope you are doing well and learned much from the previous sections.

In the previous tutorial ( Part 3 ) you learned the basic concept of adding colliders to platforms, how to rotate helix cylinder and how to add keyboard listener.

The previous part was pretty short, I did not include the Physics part of the tutorial because I wanted to keep it separate to make you understand better.

Finally, the day has come to do some heavy lifting. Lets start !


Physics

Game physics is the most interesting part of the game. Once its implemented, gives such a great feeling of being a game programmer.

But some of you may think
game physics

Don't worry guys i will try to explain in the easiest way i can.

Velocity

Earth always pulls objects to the ground, no matter where you are, you are going up or down. So gravity is constant.

In this game, we have three requirements for the ball.

1- Increase the velocity of ball till it reach the max ( we will set our max velocity )
2- Bounce the ball with the same velocity it hits the platform.
3- Ball must gain the same height every time it hits the same level as the platform.

1- Increase the velocity

When the ball is falling down then its initial velocity is zero but due to gravity, its velocity increases till it attains the max velocity and finally hits the platform.
So we will increase its velocity with the constant gravity.

Ex- Assume value of gravity is 2 ( gy = 2 ). Initially ball velocity is 0 ( vy = 0 ), but due to gravity velocity will increase ( vy = vy + gravity )  and it hits the platform at velocity 100 ( vy = 100 )

2- Bounce the ball

When the ball hits the platform its velocity was 100 ( vy = 100 )
Now ball must bounce with the same velocity ( vy = 100 ), so we will reverse the value of velocity to negative i.e ( vy = -100 )
Now ball will move in the reverse direction because its velocity is reversed.
And because we know gravity always pulls down so constant gravity will act on the negative velocity also.

3- Gain same height

We know ball velocity was reversed to negative velocity ( vy = -100 ) and constant gravity is applying on it also so ball velocity will starts to increase to a positive value ( vy = -100 + gy )
At any time ball velocity will become 0 ( vy = 0 ) till that time ball will gain the same height and will continue its journey down again.

I hope its clear how we will add gravity to the ball If its not clear leave a comment below i will try another way to explain.

Its time to begin with code.

Game.init = function() {
    
    // add this line on top of everything in this function
    this.resetGravity();
    
    ............
    ............
    ............

}

Game.resetGravity = function  () {
    this.cy = 0;   //currrent y position
    this.dt = 0.1; //delta time to make smooth movement
    this.vy = 0;   //velocity
    this.mvy = 1;  //max velocity
    this.gravity = 0.05;
    this.collision = false;
}

function update() {
    requestAnimationFrame(update);
    Game.updateKeyboard();
    Game.renderer.render(Game.scene, Game.camera);

    if (Game.GAME_STARTED) {
        if (!Game.gameOver) {
            if (Game.collision) { // ball is on surface
                Game.vy = -Game.vy;
                Game.collision = false;
            }
            Game.cy -= Game.vy * Game.dt;
            Game.ball.position.y = Game.cy;

            if (Game.vy <= Game.mvy)
                Game.vy += Game.gravity;

            Game.sphere.position.set(Game.ball.position.x, 
                Game.ball.position.y, Game.ball.position.z);
        }
    }
}

You will notice ball is falling down and after some time it will disappear. So we need to update the camera position also.


Update Camera Position

Camera must follow ball so that when the ball falls down it do not go out of viewing area.
But we must set camera position to the lowest position of ball otherwise camera will also move up and down.

Game.updateCamera = function() {

    if (this.cameraY > this.ball.position.y)
        this.cameraY = this.ball.position.y;

    this.camera.position.set(0, this.cameraY + this.player.height, -6);
    this.camera.lookAt(new THREE.Vector3(0, this.cameraY - this.player.height, 0));
    this.light.position.set(-3, this.cameraY + this.player.height + 4, -3);
}

Now the ball is falling freely and the camera is following it too.


3D Axis and Rotation

Its very important to understand how axis in 3D space works then only you will be able to put correct values to find the collision.

This will help you understand better.
3d rotation axis


The presentation of the axis above is applicable for all 3D engines and for this game also.
If you rotate any object in any axis, just keep in mind it will rotate along its axis only.

Note - If you have to rotate the vertical plane to make it look horizontal you have to rotate it along the x axis and axis of rotation for the object will always be same.

To understand it better think of you are standing with eyes closed on a 3D plane in space, and you are said to rotate the plane along its x axis. You know what is yours x axis so you will rotate along it, now you are said to rotate along your z axis, this time also you will rotate along you own z axis not along the axis of person commanding you.

I hope now you understand rotation axis of 3D space better.


Collision Detection

When we were adding colliders i said i am using 3D AABB collision detection using closest clamp method, but it did not worked for me.
I found if i am adding the colliders directly to scene, i was able detect collision successfully but when i added it in a group then collision not detected using closest clamp method. So i figured out other way to do it.

I used matrix world position to detect collision.

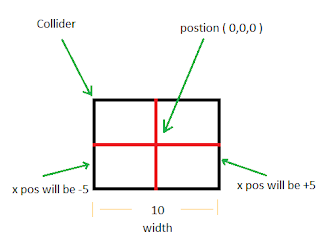
To find collision you need to focus on x,y and z position of the colliders and anchor points of it.
Just look at this.

three js plane position in 3d space


In the above image find the position of edges of collider if its anchor point is in between of it and position is x = 0, y = 0, and z = 0
According to it we have to adjust our collider parameter to -5 to +5 for x axis and similarly for z axis also.
You may think why z axis ? Its because i have rotated the collider to z axis ( z axis is depth )
For y axis we have to set at what distance above the platform ball must collide.

Jump to code for collision detection.

var ind, _cubeBox;
var boxVector;
var spherePos;
var xPoint;
var yPoint;
var zPoint;
var clearInd = 0;

Game.findCollision = function() {

    ind = Math.abs(Math.round(this.cy));

    if (this.colliderArr[ind]) {
        boxVector = new THREE.Vector3();
        for (var i = 0; i < this.colliderArr[ind].length; i++) {
            _cubeBox = this.colliderArr[ind][i];
            boxVector.setFromMatrixPosition(_cubeBox.matrixWorld);
            spherePos = this.sphere.position.clone();

            xPoint = boxVector.x;
            yPoint = boxVector.y - spherePos.y;
            zPoint = boxVector.z;

            if (xPoint < 0.6 && xPoint > -0.55 && yPoint <= 2 
                && yPoint >= -0.2 && zPoint < -1.8 && zPoint > -2.4) {
                return true;
            }
        }
    }
    return false;
}


function update() {
    requestAnimationFrame(update);
    Game.updateKeyboard();
    Game.renderer.render(Game.scene, Game.camera);

    if (Game.GAME_STARTED) {
        if (!Game.gameOver) {
            if (Game.collision) { // ball is on surface
                Game.vy = -Game.vy;
                Game.collision = false;
            }
            Game.cy -= Game.vy * Game.dt;
            Game.ball.position.y = Game.cy;

            if (Game.vy <= Game.mvy)
                Game.vy += Game.gravity;

            Game.sphere.position.set(Game.ball.position.x, 
                Game.ball.position.y, Game.ball.position.z);
            Game.updateCamera();
            Game.collision = Game.findCollision();
        }
    }
}

If you run you game then you will find ball is bouncing and colliding with platforms.

Till now we have implemented all the essential features of this game. In the next part of this tutorial series we will add some more features to our game.

So this is the end of this part of tutorial series.

Where to go from here? ( Part 5 of this tutorial )


Sunday, July 15, 2018

Helix Jump development tutorial using THREE.JS (Part 3)


Hello, guys, let's continue with the development of Helix Jump using THREE.JS

In the previous tutorial ( Part 2 ) we learned how to add platforms and multilevel platforms.
In this section, we will learn to add two type of platforms
1- Green Platforms ( safe platforms )
2- Red Platforms ( game over if the ball hits it )

I will also cover how to add colliders to platforms, which will be needed to detect collision between ball and surface.

Adding Colliders

Collision detection is typically difficult if we are not using a physics engine. But not using physics engine has its own advantages. Adding physics engine for this game will be like, picking a cup using a crane. So its just don't make any sense.

So I will add 2 rectangular colliders to each platform rotated at some angle so that it does not leave edges.

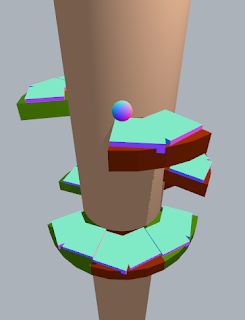
Basically, colliders will look like this.

AABB box collision

As you can see I have added a rectangular box and rotated them at an angle to cover the edges of the platform. You may think what if ball collides somewhat near to cylinder or far from the cylinder so it may not touch the surface.
For that, I want to assure you, the ball will not go anywhere because we will move the ball up and down only and also at fixed x and z value.

Have a look here ball will fall here only


I am using 3D AABB collision detection technique. But I have customized the technique for this game.
For more information on collision detection, you can visit here

I have used a simple box geometry as Collider and I have adjusted its position and rotation according to the platform position.

var collider = new THREE.Mesh(new THREE.BoxGeometry(1, 1, 0.2), 
    this.materials.solid);
collider.position.set(-1.83, -0.22, 1.11);
collider.rotation.x += Math.PI / 2;
collider.rotation.z -= 0.78;
collider.receiveShadow = true;
collider.visible = this.MESH_VISIBILTY;

This collider will have to be rotated in x-axis at Math.PI /2 degree to appear horizontal otherwise it will appear vertical.

Update Constants

Before we proceed to add random platforms ( green and red ) we need to add some constants.
I am taking some more constants which will be used later

Game.player = { 
    height: 2, 
    speed: 0.1, 
    turnSpeed: Math.PI * 0.02, 
    rotateSpeed: Math.PI * 0.01 
};
Game.materials = {
    solid: new THREE.MeshNormalMaterial({})
};
Game.MESH_VISIBILTY = true;
Game.USE_WIREFRAME = false;
Game.GAME_LOADED = false;
Game.GAME_STARTED = false;
Game.RED_PIECE = 10;
Game.GREEN_PIECE = 11;

Game.cameraY = -0.5;
Game.gameOver = false;
Game.score = 0;


Now we have to add random platforms and detect collision with the ball. so we need to save them in arrays. I have taken two array colliderArr and platformArr

Game.addPlatform = function() {

    this.colliderArr = [];
    this.platformArr = [];

    var yDiff = 2;
    var platformPieceType = [
            { type: this.GREEN_PIECE },
            { type: this.RED_PIECE }
        ];
    var rotationValue = 0.786;
    var plIndex = -1;

    var levelCount = 5;
    var collider = [];
    var platGroupArr = [];
    var colliderGroupArr = [];
    var platformPiece;
    
    var randomPlatform = [
        {
            count: 1,
            rotation: [1.3],
            type: [0]

        },
        {
            count: 5,
            rotation: [2.8, 4.8, 5.8, 7.8, 0.8],
            type: [1, 0, 0, 1, 0]
        },
        {
            count: 3,
            rotation: [7.2, 6.2, 3.6],
            type: [0, 0, 1]
        },
        {
            count: 2,
            rotation: [0.2, 2.2],
            type: [0, 1]
        },
        {
            count: 5,
            rotation: [0.9, 2.9, 3.9, 4.9, 6.9, ],
            type: [1, 0, 1, 0, 0]
        },
        {
            count: 5,
            rotation: [0, 1, 2.3, 4.1, 6],
            type: [1, 0, 1, 0, 1]
        }

    ];

    for (var a = 0; a < levelCount; a++) {

        ++plIndex;
        if (plIndex >= randomPlatform.length) {
            plIndex = 0;
        }

        platGroupArr = [];
        colliderGroupArr = [];

        var type = randomPlatform[plIndex].type;

        for (var i = 0; i < randomPlatform[plIndex].count; i++) {
            
            if (platformPieceType[type[i]].type === this.RED_PIECE)
                platformPiece = this.redPlatform.clone();
            else
                platformPiece = this.greenPlatform.clone();

            platformPiece.position.set(0, 0, 0);

            collider = [];

            collider.push(new THREE.Mesh(new THREE.BoxGeometry(1, 1, 0.2),
             this.materials.solid));
            collider[0].position.set(-1.83, -0.22, 1.11);
            collider[0].rotation.x += Math.PI / 2;
            collider[0].rotation.z -= 0.78;
            collider[0].receiveShadow = true;
            collider[0].visible = this.MESH_VISIBILTY;
            collider[0].platformType = platformPieceType[type[i]].type;
        
            collider.push(new THREE.Mesh(new THREE.BoxGeometry(1, 1, 0.2), 
                this.materials.solid));
            collider[1].position.set(-2.15, -0.22, 0.51);
            collider[1].rotation.x += Math.PI / 2;
            collider[1].receiveShadow = true;
            collider[1].visible = this.MESH_VISIBILTY;
            collider[1].platformType = platformPieceType[type[i]].type;

            var platGroup = new THREE.Group();
            platGroup.add(platformPiece);
            platGroup.add(collider[0]);
            platGroup.add(collider[1]);
            platGroup.rotation.y -= randomPlatform[plIndex].rotation[i] * rotationValue;
            platGroup.position.y -= (a * yDiff);
            this.cylinderGroup.add(platGroup);

            platGroupArr.push(platGroup);

            colliderGroupArr.push(collider[0]);
            colliderGroupArr.push(collider[1]);
        }
        this.platformArr[a * 2] = platGroupArr;
        this.colliderArr[a * 2] = colliderGroupArr;
    }
}

So far random platforms and colliders are added. Next, we have to rotate the cylinder to span all the platforms.

Cylinder Rotation

We will rotate our cylinder using arrow keys ( left arrow and right arrow ) of the keyboard.
Add key listener and update it.

function update() {
    requestAnimationFrame(update);
    Game.renderer.render(Game.scene, Game.camera);
    Game.updateKeyboard();
}

var keyboard = {};
Game.updateKeyboard = function() {
    if (!this.gameOver) {
        if (keyboard[37]) { // left arrow key
            this.cylinderGroup.rotation.y -= this.player.rotateSpeed;
        }

        if (keyboard[39]) { // right arrow key
            this.cylinderGroup.rotation.y += this.player.rotateSpeed;
        }
    }
}

window.addEventListener('keydown', function(event) {
    keyboard[event.keyCode] = true;
});

window.addEventListener('keyup', function(event) {
    keyboard[event.keyCode] = false;
});

This is the end for this part. In the next part, we will add Physics to our game and make the ball jump infinitely.

Where to go from here? ( Part4 of the tutorial )